Frequently Asked Questions
Is there really nothing painted on or underneath the threads?
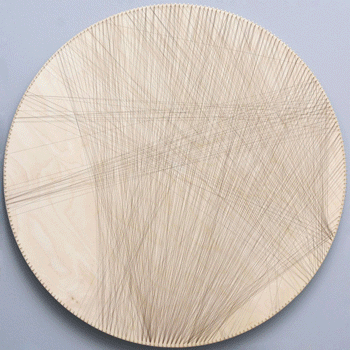
Nothing at all. There's only and exclusively thread in different colors/types/thicknesses. Most of our paintings consist of about 10,000-15,000 lines (stretches of thread connecting the nails). Every few hundred lines there is a change of thread - we cut off the current spool and tie the end of the next thread in a different color/thickness. This is how layers are formed, stacked one above the other. Below you can see an animation showing how the layers are applied until the final image is created - as you can see, there is no need for additional painting/dyeing, etc.
 watch time-lapse video - click here
What kind of thread do you use? Is it the same as for a home sewing machine?
Sometimes we use this standard thread as well, but mostly these are specialty threads, two or three times thinner. A thinner thread allows you to get a more accurate, more detailed image, although you have to use much more of it than a thicker thread. It's somewhat similar to a computer monitor or your smartphone screen - a higher resolution means smaller pixels, a larger number of them and, as a result, a clearer image.
What size are your paintings?
The standard size for us is 60cm/23,6" in diameter for a round board and 70cm x 40cm / 27.5" x 15.7" for rectangle, although at the special request of the customer, we sometimes make other sizes. Ordering a painting in a standard size ensures the shortest lead time.
And if such a thin thread breaks, will the whole picture be destroyed?
Absolutely not. The thread that creates the image runs in a completely different way than, for example, in a sweater, which can often be easily destroyed by pulling on just one thread. A string-art image cannot be disentangled this way. Thanks to the fact that the thread creates many thousands of lines/connections, arranged in a seemingly chaotic manner, when it is broken in several (even a dozen) places, in most cases it will not noticeably affect the appearance of the whole. It is also quite easy to repair such a picture on your own, although you need good eyesight and a steady, precise hand, and sometimes also a bit of patience.
In order to create such an image, how do you know which nails to connect and in what order?
Unfortunately, the human brain will not be able to come up with a connection diagram for photorealistic string-art. (Well, except maybe for the brain of a so-called savant although we haven't heard of such a case). The help of a computer is essential here. This is also the reason why this variety of string-art has only emerged relatively recently.
For images created with a single thread color, this is a fairly simple matter. When someone wants to try their hand, they can easily find descriptions of appropriate algorithms on the Internet, scientific papers on the subject, more or less ready-made programs, smartphone applications, and even online generators. Then by choosing the right source photo and adjusting usually two or three parameters one can achieve quite good results.
The situation is completely different for color images. You can't directly apply the technique used in printing or displaying color images, where you overlay three or four primary colors, they blend beautifully, and you're done. Well, the colors of the threads do not mix with each other in this way - it is not enough to apply three or four layers/colors of the thread. As a rule, it is necessary to create at least a dozen such layers, often well over 20, besides, the creation of such layers is closely related to a specific source image. It is impossible to make a universal scheme so that we throw in any source image, move the slider, press enter and it's ready.
Such layers are created for the specific types of thread you want to use. The threads differ from each other not only in color but also in thickness, some threads are partially transparent, they can also be shiny or dull, smooth or "hairy", and all this must be taken into account when developing our work.
Moreover, not every source image is suitable for us, in fact most of them are not, and usually such an image needs to be properly prepared first. Such preparation means not only basic graphic processing, such as cropping, adjusting brightness, contrast, saturation and colour tone, but also more advanced modifications - sometimes it is necessary to emphasize some contours, sometimes to suppress others, sometimes it is good to move or remove some elements of the image or change their colour, etc. As a rule, improving the appearance of one element of the image entails a loss of clarity of the rest, which leads to compromises, for example - we may give up the visibility of the pattern on the collar, but gain a more pronounced eyes and nose.
Sometimes it is impossible to make a meaningful string-art out of a given source image, and there are situations when such a conclusion is reached after many hours of working on such an image. If you think that's all, there's one more detail at the end - the threads cast a shadow on other threads underneath, and even the white thread casts a dark shadow and this also needs to be taken into account :)
How and where is it best to hang such a picture?
How - probably the easiest way is to use a nail driven into the wall or other similar installation. Just take into account that the image with a standard diameter of 60cm/23,6" weighs about 2-3kg / 4,4-6,6lbs and choose a nail (or other fastening) intended for such a load. All our works already have a suitable hanging bracket.
Follow these tips when choosing a place:
- The painting should not be exposed to high humidity, weather conditions etc. So - a bathroom or a balcony are rather out of the question.
- Avoid places that get a lot of direct sunlight.
- The image is best viewed from a distance of at least 2 meters / 6 feet, so if possible choose a rather spacious room, and avoid places such as a narrow hallway, corridor, etc.
- Choose a place where there will be no possibility of the painting coming into contact with people passing by. The danger here is threefold - it is easy to catch and break
a few unspecified number of threads, there may also be a sudden displacement of the painting towards the floor with many, potentially unpleasant consequences, moreover, a close, physical encounter of a living being with nails placed in a hanging or falling picture is usually not very comfortable for the said being.
- Make sure that the painting is out of the reach of small children and pets. These beings usually have an underdeveloped artistic sense and can easily destroy a work of art that will come within their reach, sometimes even considering it a lot of fun. Moreover, in the case of children, there is a risk of their bodies coming into contact with the nails too dynamically, which may cause phenomena such as loud noise and a sudden increase in the humidity of the eyes and their surroundings in the said child.
What program do you use to create string-art and where can I get/buy such a program?
We created such a program ourselves, for our own use and we do not plan to sell it or make it available in any other form. It was created (actually it's still being developed, we're constantly improving it, adding new features, etc) at the cost of many months of our hard work, many sleepless nights, to become our work tool. Besides, such a program itself will not create string-art, for this you also need a human being, a lot of knowledge and experience.
I also want to do string-art - can you teach me?
Unfortunately, we do not conduct, nor do we plan to conduct this type of training. We lack the talent, time, conditions and several other things.
Such string-art is a lot of hammer-tapping, do the neighbors hate you very much?
We do not hammer the nails. First, we drill small holes (silently) and then press the nails into them (noiselessly). The neighbors probably don't even know about anything :)
If you have any questions for us, or if you have a question that you think could be added to this page, please write to us at the email address below, at the bottom of the page.